Instruments
Microphones for a Drum Kit
Quick answer
Start with four microphones: kick, snare and a pair of overheads. That covers a church kit properly. The drum kit at 105 to 120 dBA sets the floor for how quiet the room can ever be, so shielding matters more than the microphone choice.
The drum kit is the loudest thing in the building at 105 to 120 dBA at three feet with peaks to 130, and that single fact governs everything about how a church platform works. It sets the minimum level the rest of the band must play at to be heard against it, it sets the minimum wedge level, and it therefore sets the minimum level of the whole service. No amount of microphone technique changes that. Before you buy microphones, decide what you are doing about the acoustic level, because in many churches the honest answer is that the kit needs shielding far more than it needs miking. See how to mic a drum kit for the full method.
On this page
How many microphones does a church kit need?
Fewer than most churches buy. A four microphone approach covers a kit properly and uses four console channels, while a seven microphone approach gives more control over individual drums and costs seven channels plus considerably more bleed and setup time.
Four microphones, kick, snare and two overheads, is the right starting point for the great majority of churches.
| Approach | Channels | Microphones | Best for |
|---|---|---|---|
| Overheads only | 2 | A stereo or spaced pair above the kit | A quiet room where the kit is already loud enough acoustically |
| Kick and overheads | 3 | Kick dynamic plus a pair above | A small platform needing only low end support |
| Kick, snare, overheads | 4 | Kick, snare and a pair above | Most churches. The right default. |
| Full close miking | 7 to 8 | Kick, snare, three toms, two overheads | A large room, an enclosed kit and an experienced operator |
Every added microphone is another open channel contributing bleed and loop gain. A seven microphone kit in a small room usually sounds worse than a four microphone kit, not better, because the bleed between channels creates phase cancellation the operator then fights with EQ.
What to buy
A kit takes a mixture of microphone types: a dedicated low frequency dynamic on the kick, a dynamic on the snare, and condensers overhead that need phantom power. Buying a kit of matched microphones is usually cheaper than assembling them individually.

Shure PG ALTA 5-Piece Drum Microphone Kit for Performing and Recording Drummers - Includes Mics, Mounts and Cables with Options for Kick Drum, Snare and Tom (PGADRUMKIT5)
$359.00Kick, snare and three tom microphones with all the mounting hardware, which is the whole kit except overheads for less than two individual microphones would cost.
Best for: A first attempt at miking the drum kit
Check price on Amazon
Shure PG ALTA 7-Piece Drum Microphone Kit for Performing and Recording Drummers - Includes Mics, Mounts and Cables with options for Kick Drums, Snare, Rack/Floor Toms, Congas and Cymbals (PGADRUMKIT7)
$659.00The five piece kit with two overhead condensers added, and the overheads are the pair that actually makes a kit sound like a kit rather than like five separate drums.
Best for: A full drum kit on a platform that is already enclosed or shielded
Check price on Amazon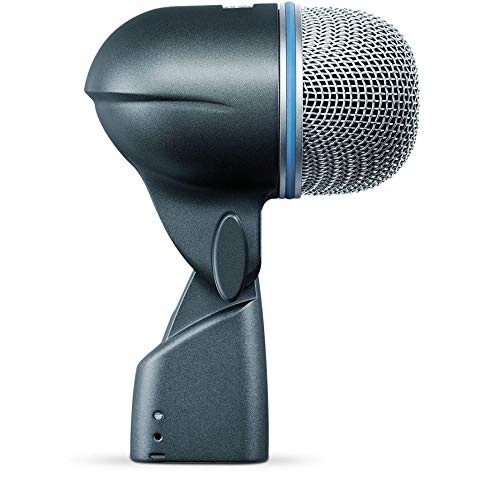
Shure BETA 52A Kick Drum Microphone - Supercardioid Dynamic Mic with High Output Neodymium Element, Locking Stand Adapter, Durabl Steel Mesh Grille and Shock Mount
$219.00A dedicated kick microphone with a shaped low end and enough headroom that it never complains. The supercardioid pattern keeps the hi-hat out of the channel.
Best for: Kick drum, and a bass cabinet at a push
Check price on Amazon
Shure BETA 91A Half-Cardioid Condenser Kick Drum Microphone
$269.00A boundary condenser that lies inside the kick drum, so there is no stand on a crowded platform and no chance of a volunteer knocking it out of position between services.
Best for: Kick drum on a tight platform where stands are in the way
Check price on AmazonPlacement that works
- Kick drum. Inside the drum through the port hole, pointed at the beater for attack or at the shell for weight, three to six inches from the head. A boundary microphone lying on a pillow inside the drum is the tidiest version and needs no stand.
- Snare. One to two inches above the rim, angled down at the centre of the head, pointed away from the hi-hat. The direction it points is the whole job: a snare microphone aimed at the hi-hat gives you a hi-hat channel.
- Overheads. Two condensers above the kit, equidistant from the snare so the snare arrives at both at the same time. Measure this with a piece of string. Unequal distances cause phase cancellation that makes the snare sound thin and hollow.
- Toms, if you use them. One to two inches above the rim, angled down at the head, away from the cymbals. Clip mounts remove stands from a crowded kit and are worth the small cost in isolation.
- Check phase before EQ. Flip the polarity switch on the kick and snare channels and keep whichever sounds fuller. This costs nothing and fixes more low end problems than any EQ move.
The gain before feedback problem specific to this position
Drums do not feed back in the usual sense, because the microphones are inches from sources producing 120 dB and there is enormous margin. The drum kit problem is the opposite: it is so loud that it appears in every other open microphone on the platform. The vocal microphones hear it, the choir microphones hear it, and the preaching channel hears it during the last song. That bleed is what limits how much you can raise any other channel, so the drum kit sets the gain ceiling for the entire system.
This is why shielding is usually a better purchase than better drum microphones. A shield in front of the kit, or a full enclosure, reduces what reaches every other microphone and lets the whole platform get quieter, which recovers headroom everywhere at once. The alternative that works even better is an electronic kit, which removes the acoustic source entirely and is an increasingly common church answer. Neither is a compromise on musicianship, and both are cheaper than the mixing problems they solve.
Channel setup
Drum channels take more processing than anything else on the platform, mostly to remove what the microphones picked up that you did not want.
High pass the overheads at 400 Hz or higher, because they exist for cymbals and the kick and snare are already covered.
| Channel | High pass | Key move | Why |
|---|---|---|---|
| Kick | 30 to 40 Hz | Cut 300 to 500 Hz, boost 60 to 80 Hz and 3 to 5 kHz | Removes cardboard, adds weight and beater attack |
| Snare | 120 to 150 Hz | Boost 200 Hz for body, 5 kHz for crack | The snare carries the groove and must cut through |
| Overheads | 400 Hz or higher | Treat as cymbal microphones, not kit microphones | The kick and snare are already covered. Filtering removes bleed and mud. |
| Toms | 80 to 100 Hz | Gate if the platform is loud | Open tom microphones are pure bleed between fills |
| All drum channels | Check polarity before EQ | Costs nothing and fixes low end problems EQ cannot |
High passing the overheads aggressively is the single change that most improves a church drum sound, and it is the one most often not done. They are there for cymbals.
What usually goes wrong
Too many microphones in too small a room, producing bleed and phase problems that get treated with EQ. Overheads at unequal distances from the snare, which makes the snare thin and hollow and is fixed with a piece of string in thirty seconds. A snare microphone aimed at the hi-hat. No polarity check. And the fundamental one: miking a kit that was already too loud, which amplifies a problem rather than solving it.
The question worth asking before any of this is whether the kit needs microphones at all. In a room under about 150 seats with a contemporary service, an acoustic kit is frequently already louder than the rest of the band and the microphones contribute almost nothing except bleed. Check the levels the room actually runs at against the dBA targets chart, and read reducing stage volume before spending anything.
How we chose
We did not test these products in person and we never claim to. Picks are researched from manufacturer specification sheets and operator manuals, FCC rules where spectrum is involved, published standards, warranty terms, and the recurring themes in verified owner reviews. Every pick is matched to a real room size, seat count or input list rather than to a price bracket, and it is placed in the tier where its capability actually belongs. Where a product is wrong for most churches we say so on the page.
Sources
- Shure published specifications for the PGA drum kits, Beta 52A, Beta 91A and Beta 56A microphones
- Published typical sound pressure levels for acoustic drum kits at 3 feet
Frequently asked questions
How many microphones does a church drum kit need?
Four is the right default: kick, snare and a pair of overheads. That covers the kit properly and uses four console channels. Full close miking with seven or eight microphones gives more control but adds bleed, phase problems and setup time, and in a small room it usually sounds worse rather than better.
Where do the overhead microphones go?
Above the kit, equidistant from the snare drum so the snare arrives at both capsules at the same moment. Measure it with a piece of string rather than by eye. Unequal distances cause phase cancellation that makes the snare sound thin and hollow, which is one of the most common church drum sound problems.
Should we high pass the drum overheads?
Yes, aggressively, at 400 Hz or higher. Overheads exist to capture cymbals, and the kick and snare already have their own microphones. Filtering out the low end removes bleed and mud without losing anything you want, and it is the single change that most improves a church drum sound.
Does our drum kit need a shield?
In most churches, yes, and it is usually a better purchase than better microphones. A kit at 105 to 120 dBA appears in every other open microphone on the platform, which limits how far you can raise anything else. A shield reduces that bleed everywhere at once and lets the whole platform get quieter.
Do we even need to mic the drums?
In a room under about 150 seats, often not. An acoustic kit is frequently already louder than the rest of the band without any reinforcement, and the microphones add bleed while contributing very little. Check what level the room actually runs at before spending, and consider whether shielding or an electronic kit serves you better.
Why does our snare sound thin?
Usually a phase problem rather than an EQ problem. Check that the overheads are equidistant from the snare, then flip the polarity switch on the snare and kick channels and keep whichever sounds fuller. Also check that the snare microphone is aimed away from the hi-hat, since a misaimed capsule gives you a hi-hat channel.
Researched, not professional advice. This page is compiled from published manufacturer specifications, operator manuals, FCC rules, published standards and owner-review consensus, not hands-on testing. Sound system design, rigging loudspeakers overhead, and any electrical work are jobs for a qualified professional: have flown loudspeakers and their attachment points signed off by a structural engineer or a certified rigger, and have all wiring done by a licensed electrician to your local code. Wireless microphone rules change, so confirm the current FCC position before buying. As an Amazon Associate we earn from qualifying purchases.